アプリの中でフォントや色などの定義を共通化したいような場合、Theme(テーマ)を用います。
参考:Flutter公式 Use themes to share colors and font styles
はじめに
Flutterでは、Themeクラスを使ってアプリの一部のみ、またはアプリ全体で共通化させることができます。MaterialAppクラスのルートでThemeクラスを作成、適用するだけで、アプリ全体手に適用されることになります。
Themeクラスは、Widgetの背景色やフォントスタイル、AppBarやボタン・チェックボックスなど様々なものに適用することができます。
Themeを作成する
を用いて作成することができます。以下のように、MaterialAppクラスのコンストラクタへ渡すことでアプリ全体に適用することができます。 Themeをコンストラクタへ渡さない場合はFlutterデフォルトのThemeが適用されます。
MaterialApp(
  title: appName,
  theme: ThemeData(
    // デフォルトの明るさ、色を定義
    brightness: Brightness.dark,
    primaryColor: Colors.lightBlue[800],

    // フォントを定義
    fontFamily: 'Georgia',

    // 文字のスタイル(太字など)を定義
    // タイトルやbodyなど、それぞれに適用するTextStyleを設定可能
    textTheme: const TextTheme(
      headline1: TextStyle(fontSize: 72.0, fontWeight: FontWeight.bold),
      headline6: TextStyle(fontSize: 36.0, fontStyle: FontStyle.italic),
      bodyText2: TextStyle(fontSize: 14.0, fontFamily: 'Hind'),
    ),
  ),
  home: const MyHomePage(
    title: appName,
  ),
);
ThemeDataの定義の仕方
独自Themeの作成する場合
他のアプリ内テーマを一才継承したくない場合は、下記のようにThemeDataクラスのインスタンスを新たに作成するだけでOKです。
Theme(
  data: ThemeData(
    splashColor: Colors.yellow,
  ),
  child: FloatingActionButton(
    onPressed: () {},
    child: const Icon(Icons.add),
  ),
);
既存Themeを拡張する場合
1から作成するのではなく、既存のテーマを拡張したほうが楽なケースがあると思います。この場合は、copyWithを使って拡張が可能です。
Theme(
  // copyWithを使って、親テーマを拡張します
  data: Theme.of(context).copyWith(splashColor: Colors.yellow),
  child: const FloatingActionButton(
    onPressed: null,
    child: Icon(Icons.add),
  ),
);
Themeを適用する
Widgetのbuild()関数内でTheme.of(context)関数を使うことで適用できます。このTheme.of関数は、Widgetツリー内における(親のWidgetを順番に見ていく形で)一番近いThemeを返します。親のWidget内で個別に適用されたThemeがあればそれを返し、特に何も適用されていなければアプリ全体で適用されているThemeを返します。
In fact, the FloatingActionButton uses this technique to find the accentColor.
Container(
  color: Theme.of(context).colorScheme.secondary,
  child: Text(
    'Text with a background color',
    style: Theme.of(context).textTheme.headline6,
  ),
),
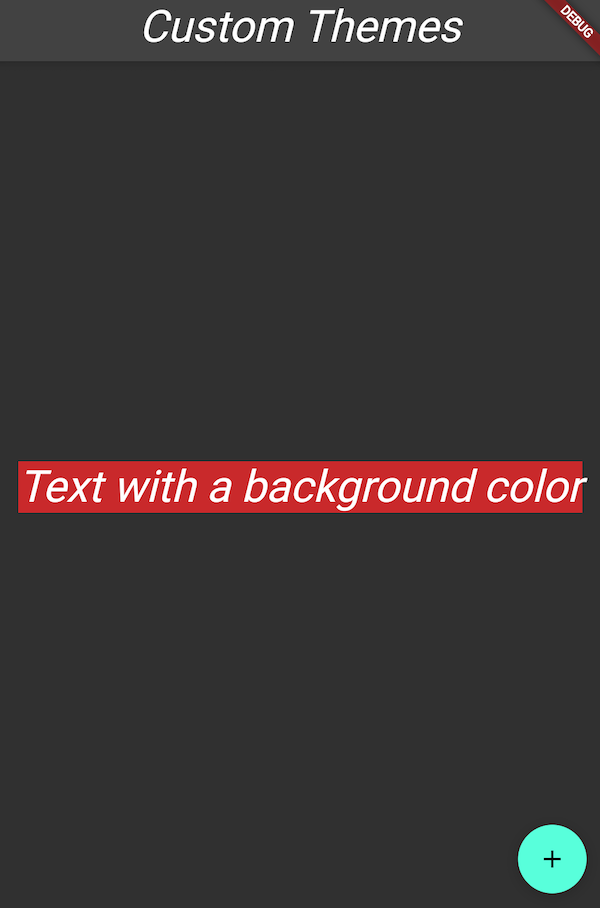
実際のサンプル
import 'package:flutter/material.dart';

void main() {
  runApp(const MyApp());
}

class MyApp extends StatelessWidget {
  const MyApp({Key? key}) : super(key: key);

  @override
  Widget build(BuildContext context) {
    const appName = 'Custom Themes';

    return MaterialApp(
      title: appName,
      theme: ThemeData(
        // デフォルトの明るさ、色を定義
        brightness: Brightness.dark,
        primaryColor: Colors.red[800],

        // フォントを定義
        fontFamily: 'Georgia',

        // 文字のスタイル(太字など)を定義
        // タイトルやbodyなど、それぞれに適用するTextStyleを設定可能
        textTheme: const TextTheme(
          headline1: TextStyle(fontSize: 72.0, fontWeight: FontWeight.bold),
          headline6: TextStyle(fontSize: 36.0, fontStyle: FontStyle.italic),
          bodyText2: TextStyle(fontSize: 14.0, fontFamily: 'Hind'),
        ),
      ),
      home: const MyHomePage(
        title: appName,
      ),
    );
  }
}

class MyHomePage extends StatelessWidget {
  final String title;

  const MyHomePage({Key? key, required this.title}) : super(key: key);

  @override
  Widget build(BuildContext context) {
    return Scaffold(
      appBar: AppBar(
        title: Text(title),
      ),
      body: Center(
        // ここのTheme.ofは親のTheme、つまり上で定義したThemeを返している
        // 背景色を上で定義した赤色に設定
        // テキストのスタイルに、上で定義したheadline6のものを適用
        child: Container(
          color: Theme.of(context).colorScheme.secondary,
          child: Text(
            'Text with a background color',
            style: Theme.of(context).textTheme.headline6,
          ),
        ),
      ),
      // 上で定義したThemeを拡張し、splashcolorを黄色で定義
      floatingActionButton: Theme(
        data: Theme.of(context).copyWith(splashColor: Colors.yellow),
        child: FloatingActionButton(
          onPressed: () {},
          child: const Icon(Icons.wifi),
        ),
      ),
    );
  }
}
コメントを残す